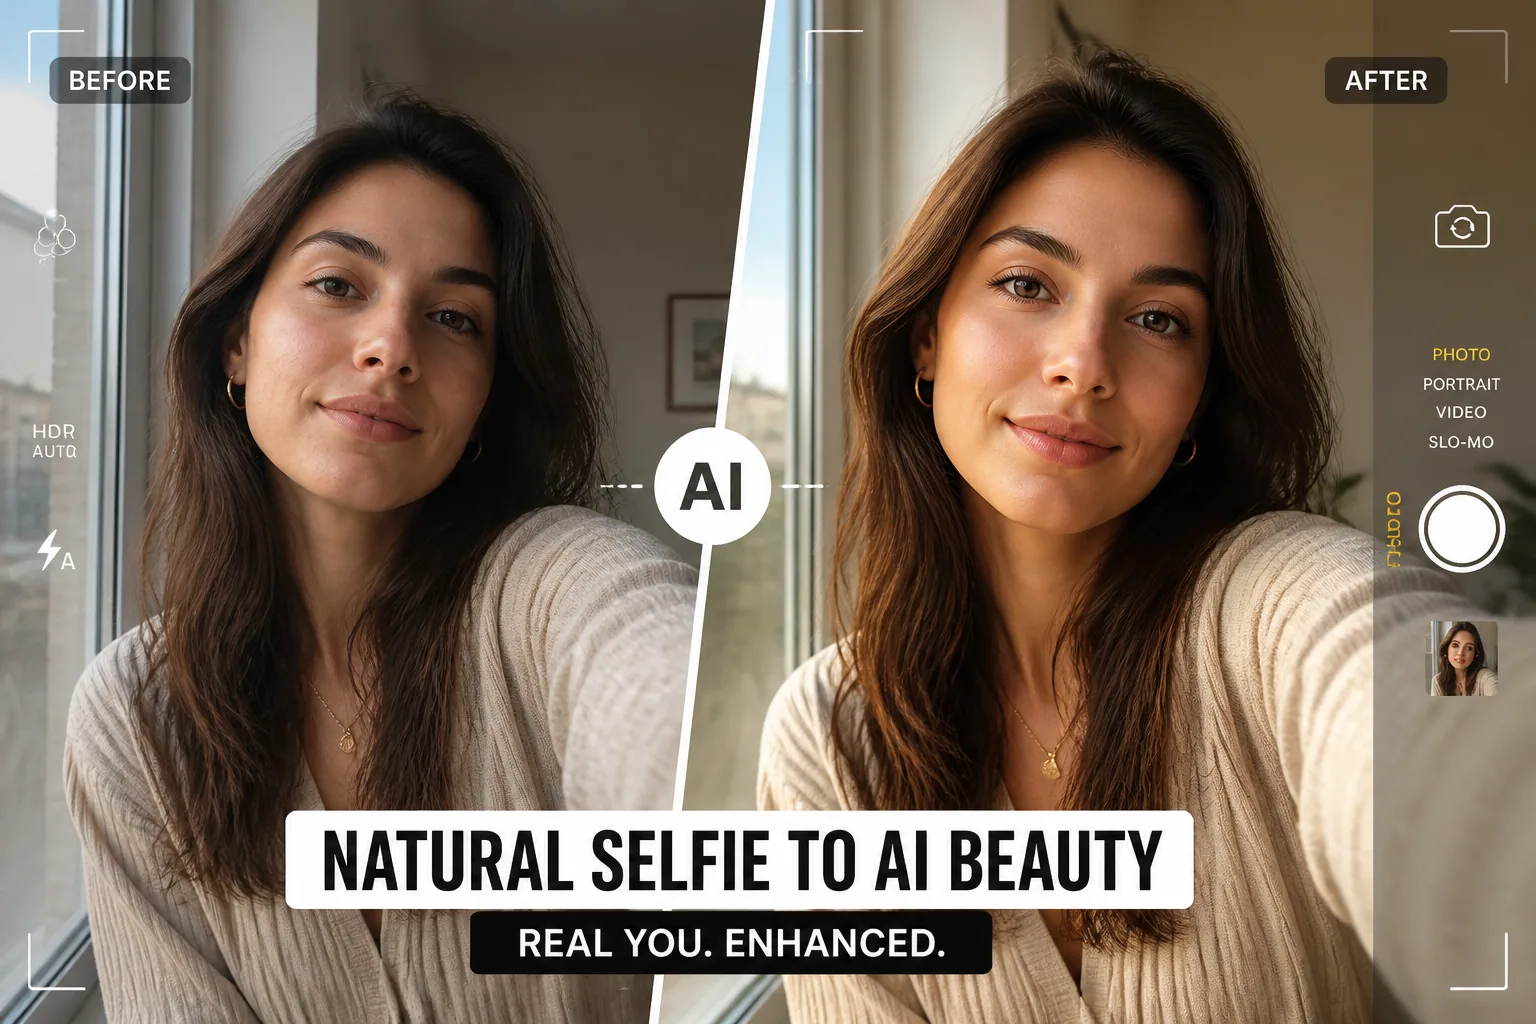
How AI + Humans Can Create Selfie Portraits That Actually Look Camera-Real
Most AI selfie portraits look fake for the same reason most amateur portraits look fake: they ignore the basics. Even the best image model can still produce strange hands, waxy skin, mismatched eye reflections, or a background that feels like it was assembled from memory instead of observed in a real room. The good news is that believable portraits are absolutely possible in 2026, but they work best when AI is guided by human photography instincts. That means thinking like a photographer first, then using AI as the rendering engine.
The core idea is simple. If you want an AI portrait to feel camera-authentic, you need to control the things real cameras control: light, pose, framing, focal length, texture, and subtle imperfection. When you combine those fundamentals with strong reference photos and realistic prompt language, the result stops looking like synthetic art and starts looking like an actual image captured by a lens.
Why Most AI Selfie Portraits Still Look Fake
AI portraits often fail because they are optimized to look plausible at a glance, not photorealistic under close inspection. That is why people immediately notice “AI vibes” in the face, hands, hairline, and skin. The image may have attractive lighting and appealing composition, but the details do not behave like a real camera recorded them.
The most common giveaways are repeated textures, overly smooth facial skin, odd eye catchlights, and hands that bend in ways human joints do not. Research continues to show that hand anatomy remains a persistent weakness in generative image systems, especially when fingers are occluded, interlaced, or gripping something. Eyesift’s 2026 guide highlights fused fingers, wrong finger counts, and unnatural grip geometry as recurring issues, and the HanDiffuser work explores better realism for hands in generated imagery: https://www.eyesift.com/blog/how-to-spot-ai-images-2026/ and https://arxiv.org/abs/2403.01693
Eyes are another major tell. Real portraits usually have catchlights that match the actual lighting setup, while AI can create reflections that look random, duplicated, or physically impossible. Skin is also a problem, since AI often pushes it into a polished, airbrushed look with no pores, no fine lines, and no small asymmetries. That is why the best workflow is not just “generate and post.” It is “observe, guide, refine, and correct.”
Start With Human Fundamentals: Light, Pose, and Composition
Before you write a prompt, decide what a real photographer would do. Ask yourself where the light is coming from, how the subject is positioned, and what the frame is trying to say. A convincing portrait starts with a believable scene, not with fancy adjectives.
Pose matters because the body tells the brain whether the image feels lived-in. A slight head tilt, relaxed shoulders, natural hand placement, and an easy expression all help. Overly symmetrical faces and rigid postures can make AI portraits feel like catalog cutouts. In real camera work, tiny imperfections create life. A real smile is rarely perfectly centered. A real shoulder line is rarely perfectly level. Those small irregularities matter.
Composition matters too. A portrait that is cropped too tightly, centered too aggressively, or lit too evenly can feel artificial. Human photographers use framing to create balance, depth, and context. That is why AI portraits often improve when you specify a natural crop, a subtle background blur, and a subject position that leaves breathing room in the frame.
Using Reference Photos to Preserve Identity and Facial Consistency
If you want an AI portrait to actually resemble a specific person, strong reference photos are essential. The goal is to preserve facial structure, bone shape, skin tone, and distinctive features rather than letting the model invent a generic face. This becomes especially important when generating multiple portraits of the same person for social media or personal branding.
Academic work on human artifact detection has shown how often identity-related features can be compromised when generative models distort facial landmarks. That is why a handful of clean reference selfies, taken in good light and from slightly different angles, can dramatically improve consistency. The AI needs to learn what the subject truly looks like before it can render them in different scenes or styles. See the HAD paper here: https://arxiv.org/abs/2411.13842
For best results, choose references that show the same person in neutral expression, soft side light, and no heavy filters. Avoid extreme angles, strong makeup changes, or phone camera distortion if identity consistency is the priority. The more the model sees stable facial information, the less likely it is to invent strange eye shapes, warped jawlines, or mismatched facial proportions.
Natural Light vs Studio Light: What Produces More Believable AI Results?
Lighting is one of the biggest reasons some AI portraits feel believable and others do not. Realistic portraits depend on light that behaves like light in the physical world. That means direction, softness, color temperature, and intensity all need to make sense together.
Natural light usually creates the easiest path to realism because people are familiar with how daylight looks on skin. Soft window light, late-afternoon sun, and open shade all produce gentle transitions, realistic shadows, and flattering facial texture. Soft, large light sources close to the subject tend to give the most forgiving results, while small or distant sources create harsher shadow edges and can expose model weaknesses. This is consistent with portrait lighting guidance from CameraTale and ShutterFox: https://www.cameratale.com/understanding-lighting-in-portrait-photography-key-strategies-for-stunning-results/
Studio light can also look highly authentic, but only when it follows familiar portrait conventions. Classic patterns like butterfly, loop, Rembrandt, split, broad, and short lighting still work because they are visually encoded in how we expect portraits to look. Loop lighting is especially versatile and flattering, while Rembrandt lighting adds depth and character by creating the familiar triangle of light beneath the nose shadow. PhotoWorkout and Photography Shark both emphasize these classic setups as enduring standards in portrait work: https://www.photoworkout.com/lighting-patterns/
Three-point lighting is another reliable choice when you want a controlled, professional result. The key light shapes the face, the fill light softens shadows, and the rim light separates the subject from the background. When AI images feel flat or cut out, the problem is often that the lighting has no believable direction or hierarchy. Giving the model a clear key-fill-rim structure can make the portrait feel much more like an actual photograph.
Prompting for Realism With Camera, Lens, and Film Language
One of the easiest ways to improve AI realism is to speak the language of photography. Instead of vague prompts like “realistic selfie,” use specific descriptors that signal how real cameras produce images. Include camera body cues, lens focal length, aperture feel, shot type, lighting style, and even film stock references when appropriate.
For example, terms like “85mm lens,” “shallow depth of field,” “soft warm golden hour light,” “shot on Fujifilm X-T5,” and “400 ISO film grain” help anchor the image in a physical photographic context. Prompt communities in 2026 keep returning to the same formula: subject, lens, lighting, environment, and film stock. That structure pushes the model away from generic digital gloss and toward believable capture behavior. A useful discussion of this approach can be found here: https://www.reddit.com/r/Aiarty/comments/1qwhkpe/the_ultimate_guide_to_photorealism_in_midjourney/
The reason this works is that cameras create familiar visual signatures. An 85mm portrait tends to flatten features pleasantly. A shallow depth of field isolates the face from the background. Film grain adds controlled texture that counteracts the over-smooth look of AI outputs. Even if the image is not literally shot with that gear, specifying these traits gives the model a more realistic target state.
A strong realism prompt might include phrasing like: natural candid selfie, 50mm lens look, soft window light, realistic skin texture, subtle pores, natural eye reflections, gentle background blur, unedited phone camera aesthetic. The key is to describe what a real image would look like, not just what a pretty image should feel like.
How Framing and Focal Length Affect the ‘Real Camera’ Look
Framing is one of the most underrated realism signals in AI portraits. Humans are extremely good at noticing when a face is framed in a way that feels too perfect, too centered, or too digitally manufactured. Real selfies often have slight asymmetry, imperfect headroom, and small composition quirks that make them feel captured rather than designed.
Focal length matters because it changes facial proportions. Wide lenses can exaggerate noses, foreheads, and the distance between features, especially in close selfies. Longer focal lengths compress the face more naturally and are often more flattering for portraits. That is why specifying a portrait-friendly lens length, such as 50mm or 85mm, often improves results. It nudges the AI toward a perspective that matches human expectations of real portrait photography.
You can also improve authenticity by asking for an imperfect but natural crop. Leave a little room at the top of the head, avoid flattening the shoulders too much, and let the background fall away softly. A believable selfie often looks like a moment caught in passing, not a carefully engineered poster.
The Biggest AI Artifacts in Selfie Portraits and How to Fix Them
Even with good prompts and references, AI portraits can still produce artifacts. The important thing is knowing which ones are most visible and how to correct them before publishing.
Hands are the biggest problem area. AI still struggles with complex hand anatomy, especially if the hand is partially hidden, holding an object, or making a gesture. Watch for fused fingers, incorrect counts, broken knuckles, or grip shapes that do not match the object being held. If a hand is visible in a selfie portrait, keep the pose simple whenever possible. If the hand is not essential, crop it out or replace the pose with one that reduces finger complexity.
Eyes are the next major issue. Look carefully at catchlights, pupil symmetry, and eyelid shape. If the reflections do not match a visible light source, the portrait will feel fake even if the face is otherwise strong. A quick manual correction to catchlights can make a big difference. So can reducing overly sharpened eye detail that makes the subject look uncanny.
Skin can also betray AI outputs through a waxy surface, uniform complexion, or a total lack of real-life variation. Realistic skin should have pores, small blemishes, faint redness changes, and subtle texture shifts across cheeks, nose, and forehead. If the portrait looks airbrushed, add texture back during post-processing rather than letting the image remain unnaturally polished.
Backgrounds frequently show color banding, halo edges, repeated patterns, or texture inconsistencies. These artifacts are often linked to sampling issues, mismatched VAE settings, or excessive stylization. Guides from ZSky AI and Nemora.ai point to these recurring problems and note that high CFG scales and strong style modules can make them worse: https://zsky.ai/blog/ai-image-artifacts-guide and https://nemora.ai/blog/fixing-common-issues-in-ai-image-generation/
Post-Processing Tips for Hands, Skin Texture, Eyes, and Background Details
Post-processing is where good AI portraits become convincing ones. The goal is not to over-edit. The goal is to remove the obvious “AI tells” while preserving a natural photographic feel.
For hands, zoom in and check every finger joint. If a finger is warped or merged, use inpainting, retouching, or a targeted crop to simplify the composition. Sometimes the best fix is not rebuilding the hand in detail, but reducing how much of it appears in the frame. That is often more realistic than trying to force a perfect but unnatural reconstruction.
For skin, restore micro-texture with subtle grain and controlled contrast. Avoid heavy smoothing filters. A believable portrait should still show pores, fine lines, and the tiny irregularities that real cameras capture. If the image is too clean, it starts to resemble a plastic render rather than a photograph.
For eyes, make sure each catchlight has a believable position and shape. If needed, adjust the highlights so they match the direction and size of the key light. Do not make the eyes overly sharp or overly bright. Real eyes are detailed, but they are not glowing. Small corrections often work better than dramatic ones.
For backgrounds, remove halos, strange edge fringing, and repeated textures that draw attention away from the face. Add natural blur if the scene feels too crisp in areas that should be out of focus. The background should support the portrait, not compete with it.
When to Trust AI Automation and When to Edit Manually
Automation is useful when you need volume, speed, or stylistic variation. It is especially helpful for generating multiple concept directions, testing different outfits, or exploring different lighting moods. If you need ten social media options quickly, AI can do that efficiently.
Manual editing becomes more important when identity matters, when the image will be used for branding, or when the portrait needs to survive close inspection. If the face must resemble a real person accurately, human review is not optional. The same is true if you notice obvious artifacts in the hands, teeth, eyes, or background. AI can get you close, but careful human judgment usually finishes the job.
A practical rule is this: let AI handle the first 80 percent, then let human editing handle the final 20 percent. That final stretch is where realism lives. It is where you correct anatomy, align light, improve texture, and remove those tiny inconsistencies that make an image feel synthetic.
A Simple Workflow for Creating Camera-Authentic AI Selfies
A reliable workflow keeps the process repeatable. First, collect strong reference selfies in natural light with clean facial visibility. Use a few angles, but keep the expression and identity consistent. Second, define the portrait style you want: casual phone selfie, polished headshot, golden hour outdoor shot, or studio portrait.
Third, write the prompt using photographic language. Mention lens, lighting, pose, and texture. Fourth, generate several variations and compare them with a real photo mindset. Ask which one has believable skin, believable eyes, natural proportions, and a background that makes sense. Fifth, do a close inspection for hands, catchlights, halos, and skin texture. Correct the obvious problems before sharing the result.
If you want an easier starting point for experimenting with identity-based portrait generation, a tool like Selfie AI: AI Photo Generator can help turn a few selfies into a personalized model for different portrait styles, which is useful when you want fast variation without rebuilding the subject from scratch: https://findthe.app/selfie-ai-0xi7wd
Best Use Cases for Social Media, Profile Photos, and Personal Branding
AI selfie portraits are especially useful when the goal is a polished but still approachable image. For social media, they can provide variety without requiring a full photo shoot. For profile photos, they can create a clean, flattering look that still feels like the real person. For personal branding, they can help maintain a consistent visual identity across platforms.
The best use cases are the ones where the portrait needs to feel elevated, not deceptive. Think creator profile images, LinkedIn-style headshots, podcast artwork, content thumbnails, and campaign visuals. In these cases, realism matters because audiences trust portraits that feel grounded in real photography. A portrait that looks too synthetic can reduce credibility, even if it is technically impressive.
That is why the safest and strongest approach is to aim for camera-authenticity rather than hyperreality. You do not need the image to be indistinguishable from a RAW file. You need it to obey the visual rules of real photography well enough that viewers accept it instantly.
Final Checklist: How to Make an AI Portrait Feel Genuinely Real
Before you publish, check the basics. Does the lighting make physical sense? Do the eyes have catchlights that match the scene? Are the hands anatomically believable or safely minimized? Does the skin still have real texture? Does the focal length feel portrait-appropriate? Does the background support the subject without obvious AI artifacts?
If the answer is yes to most of those questions, you are close. The final secret is restraint. Real portraits usually do less, not more. They keep the face natural, the light readable, the framing imperfect in a human way, and the retouching subtle. When AI is guided by those same principles, the result can look genuinely camera-real rather than generically generated.