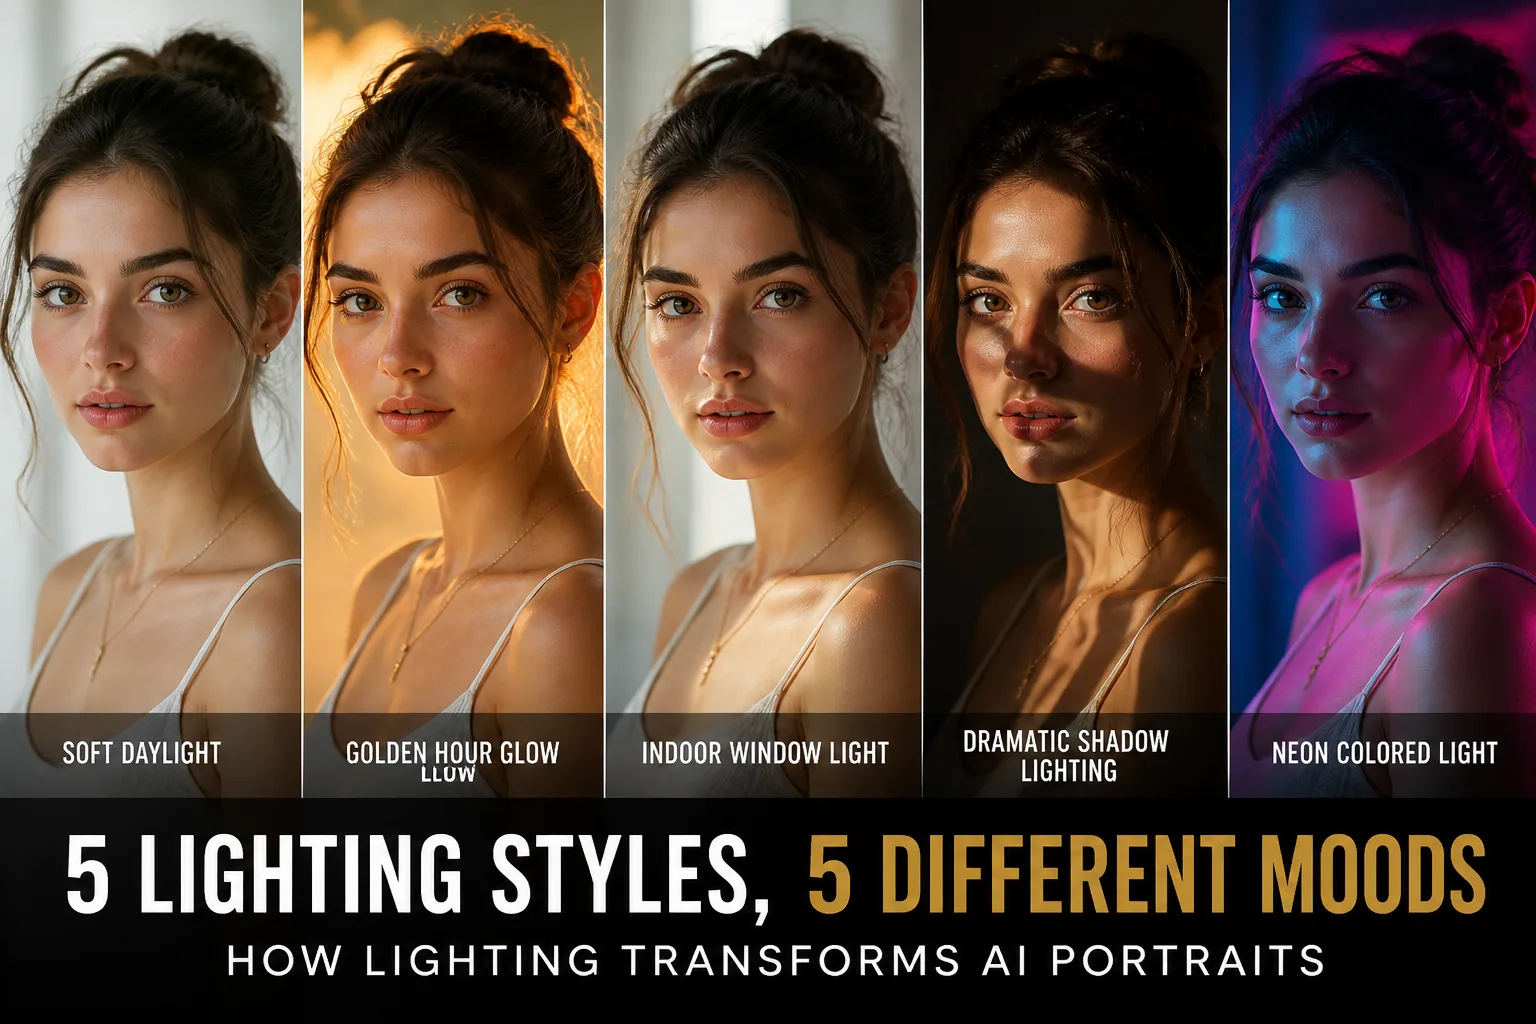
AI Portrait Lighting Mastery: How Different Light Sources Change Mood, Realism, and Trust
Lighting is one of those details that people notice instantly, even when they do not realize they are noticing it. In AI portraits, it can be the difference between a result that feels polished, believable, and emotionally clear, and one that feels flat, plastic, or just a little suspicious. The face might be the same, but the light can completely change how that face is read.
That is because light does more than brighten a portrait. It shapes skin texture, softens or sharpens facial contours, creates catchlights in the eyes, and gives the image a mood. A portrait lit with warm, diffused daylight feels very different from one lit by dramatic side shadows or neon color. The AI also responds to these cues, which means your input selfie and your prompt both benefit when you understand the basics of portrait lighting.
Why Lighting Matters More Than Most People Think in AI Portraits
When people think about making a good AI portrait, they usually focus on the face, the outfit, or the style. But lighting is often the hidden factor that decides whether the final image feels authentic. Good lighting helps the AI preserve facial structure, skin detail, and eye realism. Poor lighting can hide important information, flatten the face, or create strange shadows that the model then has to guess at.
This matters even more because AI portraits rely on the quality of the input. If the selfie is taken under harsh overhead light, with deep eye sockets, shiny hotspots, or mixed color casts, the generator may exaggerate those issues or smooth them away too aggressively. Either way, the result can lose identity and trustworthiness.
In short, lighting is not just about making a photo look nice. It is about giving the AI clean visual data to work with, while also setting the emotional tone of the portrait.
How AI Interprets Light, Shadow, and Skin Texture
AI portrait models are very sensitive to patterns that humans also use to judge realism. They read shadow placement, highlight intensity, color temperature, and the way light interacts with skin. When these elements are coherent, the portrait feels grounded. When they conflict, the image starts to feel synthetic.
One of the biggest realism cues is skin texture. Research and portrait guidance consistently point out that preserving natural texture, including pores, subtle gloss, slight redness, and micro-variation, helps preserve identity and realism. Overly smooth skin is one of the clearest signs that something is off in an AI-generated portrait, because it removes the natural complexity people expect to see in a real face.
Catchlights matter too. Reflections in the eyes tell the viewer where the light is coming from, and they add life to the portrait. If the catchlights are missing, too strong, or inconsistent with the rest of the lighting, the portrait can feel uncanny even if everything else looks correct. In practice, believable AI portraits usually combine natural-looking skin texture with coherent shadow direction and clear eye reflections.
If you want to guide that process more precisely, tools like Selfie AI: AI Photo Generator can be especially useful because the quality of your source selfie directly affects the final result, and the app works best when the lighting already gives the model a clean, flattering base to build on: https://findthe.app/selfie-ai-0xi7wd
Natural Daylight: The Gold Standard for Realistic AI Selfies
Natural daylight is often the safest and most realistic choice for AI portraits. It tends to reveal the face evenly, maintain believable skin tones, and create a look that feels honest rather than overly staged. The best daylight is usually soft and indirect, not harsh and direct. Think near a window, in open shade, or on a bright day without the sun hitting the face directly.
Daylight in the daylight-matched range, often around 5000 K to 5600 K, keeps skin tones neutral and avoids strong color casts. That makes it especially useful for professional headshots or portraits that need to feel clean and trustworthy. Warm or cool shifts can still happen, but neutral daylight gives the AI a stable starting point.
The main advantage of natural light is that it creates a believable balance between highlight and shadow. The face still has dimension, but not so much contrast that the model has to invent missing detail. This usually means better fidelity in the eyes, smoother transitions across the cheeks, and fewer strange artifacts around the nose or jawline.
If you are taking a selfie for AI generation, this is one of the easiest setups to repeat. Stand facing a window, turn your head slightly to keep the face lively, and avoid direct midday sun. That simple choice often produces a much more realistic portrait than an indoor shot with a random ceiling light.
Golden Hour Lighting: Warmth, Glow, and Instant Mood
Golden hour is popular for a reason. It brings a warm directional glow that makes skin look healthier, softer, and more dimensional. The light is low in the sky, so it creates longer shadows and gentler highlights, which can add elegance without making the face look harsh. In AI portraits, this often translates into a more cinematic and emotionally rich result.
Research on portrait lighting notes that golden hour enhances texture and volume on the face without the harshness of midday overhead light. That gives the portrait a sense of depth while still keeping it flattering. It is especially effective when you want the final image to feel romantic, nostalgic, or quietly dramatic.
The warm tones also help many skin types look vivid and inviting. Warm color temperatures in the rough range of 2700 K to 4000 K are often considered flattering because they soften features and create a healthier overall impression. In AI terms, this can lead to portraits that feel more human and less clinical.
Golden hour does come with a tradeoff. Because the shadows are longer and the direction is more obvious, it can exaggerate asymmetry or texture if the angle is too extreme. So if the goal is realism with a touch of mood, golden hour is excellent. If the goal is strict corporate clarity, a softer front-lit setup may be better.
Soft Indoor Lighting: Clean, Flattering, and Professional
Soft indoor lighting, especially window light diffused by curtains, is one of the most reliable choices for professional-looking AI portraits. It creates gentle facial modeling, reduces shine, and smooths transitions across the skin without erasing detail. The face remains readable, but not overly stylized.
This type of lighting is particularly useful for headshots. Front-facing or slightly elevated light tends to promote facial symmetry, and it is often perceived as flattering, professional, and trustworthy. That is one reason many business portraits use soft, even light rather than bold shadow patterns.
A good indoor setup also helps the AI interpret the face with less ambiguity. You want enough contrast to show depth, but not so much that the under-eye area, nose, and chin become overly dark. Avoiding harsh overhead lighting is especially important because it often creates the so-called raccoon effect in the eye sockets and unflattering shadows under the chin.
For input selfies, this means aiming for soft side or front light around 15 to 30 degrees above eye level. That placement adds definition while keeping the image open and approachable. It is one of the most effective compromises between realism and polish.
Dramatic Shadows: When Contrast Adds Power or Breaks Realism
Dramatic shadow-heavy lighting can make an AI portrait feel powerful, cinematic, and emotionally intense. High contrast lighting often works well for moody editorial looks, noir-inspired portraits, or creative characters with a strong visual identity. Deep shadows can add gravity and tension in a way that soft light simply cannot.
At the same time, contrast can reduce perceived trustworthiness. Research on lighting contrast shows that softer, lower-contrast light is more often associated with warmth, approachability, and authenticity, while high contrast tends to evoke stronger emotion but less trust. That makes dramatic lighting a style choice, not a universal upgrade.
The risk is that the AI can overdo the shadows or lose important facial cues. If one side of the face disappears into darkness or the eye sockets become too deep, the portrait may feel less like a person and more like an effect. The best dramatic portraits still preserve enough facial information for the viewer to recognize expression, eye detail, and contour.
In practice, dramatic lighting is best reserved for portraits where mood matters more than neutrality. If you want authority, intrigue, or artistic edge, it can be a strong choice. If you want a portrait to feel friendly and dependable, it should be used more carefully.
Neon and Colored Lights: Bold Style Without Losing the Face
Neon and colored lighting can produce some of the most visually exciting AI portraits. Blues, magentas, purples, and other saturated tones can instantly make the image feel futuristic, nightlife-inspired, or creatively playful. This is where AI really shines as a style tool, because the lighting itself becomes part of the identity of the image.
But colored light also carries risk. Strong color casts can obscure skin tone, flatten texture, or make the face look less natural if overused. The best results usually keep the colored light directional and intentional, while still preserving enough neutral detail in the skin and eyes so the face remains believable.
A good rule is that the portrait should still read clearly in monochrome terms. If the face only works because of the color effect, it may be too dependent on styling and not enough on structure. The AI should still show cheekbones, eyes, lips, and hair in a way that feels coherent, even under vivid lighting.
Colored light works especially well for social content, creative branding, music-inspired visuals, and experimental portraits. It is less suitable for conservative professional headshots, but very effective when personality and visual impact matter more than neutrality.
How Lighting Direction Changes Facial Contours and Expression
Lighting direction controls how the face is read. Front light tends to flatten features slightly, but it also evens out skin and emphasizes symmetry. Side light adds depth and shape by creating shadows along the cheeks and jawline. Top light can create drama, but it often leaves the eyes and mid-face less flattering.
Research suggests that side lighting striking the face from 15 to 30 degrees above and to one side adds definition to cheekbones and jawlines while producing longer shadows. This enhances perceived facial depth, but it can also emphasize texture and asymmetry. That is useful if you want realism with structure, but not ideal if you are trying to hide blemishes or irregularities.
Front-centered light, slightly elevated, generally creates the most symmetrical and trustworthy look. It is often the best option for corporate portraits and profile photos where the goal is to present the face clearly and professionally. Extreme side angles, by contrast, can turn the portrait into something more artistic than approachable.
The direction you choose should match the message. Straightforward and dependable calls for centered light. Intriguing and sculptural calls for side light. Mystical or cinematic calls for more pronounced directional shadow. The AI will follow those clues closely.
The Role of Light Intensity and Color Temperature in Authenticity
Intensity and color temperature work together to define how authentic a portrait feels. Light that is too weak can leave the face dull and underdefined. Light that is too intense can blow out highlights and erase subtle details. The best portraits usually sit in the middle, where the face remains clearly modeled without looking harsh.
Color temperature is equally important. Warmer light often feels more flattering and emotionally inviting, especially in the 2700 K to 4000 K range. Cooler light above about 5500 K can emphasize skin blemishes, under-eye circles, and minor texture differences, which is not always a bad thing if realism is the goal, but it can be less forgiving.
For studio-style results, the sweet spot is often around 5000 K to 5600 K. That range behaves similarly to daylight and tends to keep skin tones neutral. It is especially useful when you want the AI portrait to look believable across different clothing styles, backgrounds, and final formats.
If the image feels fake, one of the first things to check is whether the light and the mood match. A warm, sunny scene with a blue-toned face can feel disconnected. A professional headshot with wild color shifts can feel accidental. Authenticity is often just consistency done well.
Before-and-After Lighting Changes That Transform the Same Portrait
The same face can look completely different depending on the lighting setup. Under flat overhead light, the portrait may feel tired or featureless, with shadows collecting beneath the eyes. Move that same face to a window with soft side light, and suddenly the cheekbones appear more defined, the eyes gain life, and the skin tone looks more natural.
Golden hour can turn the same subject into someone who appears warm, cinematic, and quietly romantic. Switch to a dramatic contrast setup, and the expression becomes stronger and more intense. Add a neon edge light, and the portrait shifts again into a more stylized, creative space.
This is why lighting is such a powerful creative control in AI portrait generation. You are not just changing brightness. You are changing perceived personality. A viewer will often assume a portrait is confident, friendly, serious, playful, or mysterious based largely on how the light falls across the face.
Best Lighting Tips for Taking Input Selfies for Selfie AI
If you want better AI results, start with better source selfies. The most useful input images are usually clear, evenly lit, and taken in a setup that keeps the face readable from forehead to chin. Avoid dark rooms, mixed color lighting, and extreme camera angles whenever possible.
A few practical rules make a big difference. First, use soft daylight or a diffused indoor source. Second, keep the light slightly above eye level and roughly centered or just off-center. Third, make sure the eyes are well lit so the AI can place realistic catchlights. Fourth, preserve natural skin detail instead of trying to blur everything away.
It also helps to avoid harsh overhead lights, especially bathroom lights or ceiling fixtures that create deep shadows in the eye sockets. Those shadows are hard for AI to correct cleanly. A window with light curtains, or a bright room with bounced light, usually gives much better results.
For people using tools like Selfie AI, this is where a little preparation pays off. A few well-lit selfies can give the model much cleaner information about your features, which helps the generated portraits look more like you and less like a generic face.
Lighting Mistakes That Make AI Portraits Look Fake or Untrustworthy
The most common lighting mistake is harsh overhead light. It creates deep eye shadows, hard under-chin lines, and an overall tired look. Another frequent issue is mixed lighting, such as daylight from one side and a warm lamp from the other. That can confuse the AI and cause strange skin tones or uneven facial shading.
Overexposure is another problem. If the face is too bright, highlights can wipe out skin texture and make the portrait look plastic. On the opposite end, underexposure hides detail and forces the model to invent texture that was never visible in the source image.
There is also the issue of inconsistent catchlights. If the eyes show light from one direction but the shadows on the face suggest another, the portrait can feel uncanny even to someone who cannot explain why. Small lighting inconsistencies are often what make a generated face feel “off.”
The best way to avoid these problems is to keep the lighting simple and coherent. One good light source is usually better than three conflicting ones.
Choosing the Right Lighting for Social Media, Headshots, and Creative Portraits
Different goals call for different lighting styles. For social media, especially if you want warmth and personality, soft daylight or golden hour often works best. These setups feel natural, flattering, and easy to trust at a glance. They also support the kind of approachable realism people expect in profile photos.
For headshots, the goal is usually clarity and professionalism. Front-centered or slightly elevated soft light around the daylight range is ideal. It keeps the face open, minimizes distracting shadows, and gives the portrait a polished look without making it too theatrical.
For creative portraits, you have much more freedom. Side light, shadow-heavy setups, and colored neon lighting can all work if you want a distinctive mood. The key is to make sure the style supports the subject rather than hiding the subject.
The right lighting is not always the most dramatic one. It is the one that matches the purpose of the image.
How to Balance Realism and Style for the Best Final Result
The best AI portraits usually sit somewhere between realism and style. Too little style, and the image can feel generic. Too much style, and the face may become less believable. Lighting is the main tool for finding that balance.
If realism is the priority, choose soft daylight, neutral color temperature, visible skin texture, and consistent catchlights. If style is the priority, introduce more directional light, warmer tones, stronger shadows, or color accents, but keep the facial structure readable. The portrait should still feel like a real person, even if the mood is highly designed.
That balance is what makes an AI portrait successful. It should flatter the subject, communicate a clear mood, and remain convincing at the same time. When the lighting does its job, the result does not just look good. It feels believable.